
by Myron Ferguson
These versatile joint compounds are ideal for small jobs, quick repairs, and tough field conditions
Most of the time, I use ready-mix joint compounds to tape and finish the drywall I hang. But occasionally I find myself working in less-than ideal drying conditions, or on small jobs that need to be finished within a day or two. To keep these jobs moving, I reach for bags of setting compound instead of buckets of mud.
Setting compounds harden through a chemical reaction rather than through evaporation, making their setting times predictable and consistent. And once a coat of setting compound has set up, it can be covered with another layer of compound even if it’s not completely dry, which speeds along the taping process.
In addition to using setting compounds on small jobs that I need to finish as quickly as possible — and on most of my repairs — I use them to prefill gaps or damaged areas before embedding tape.
Types of Compounds
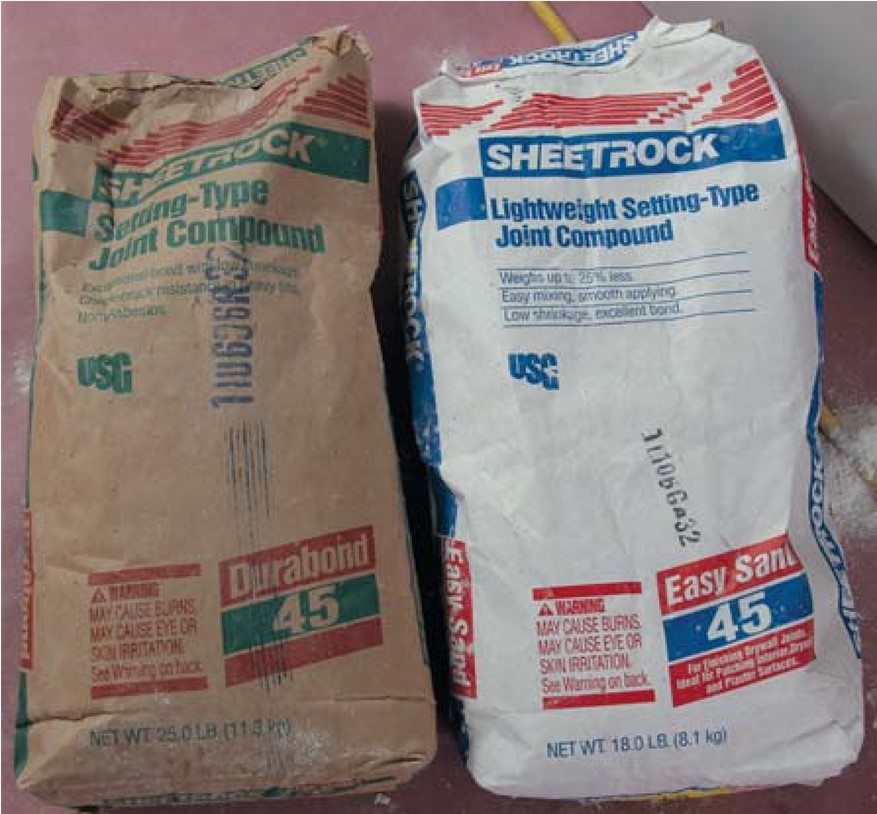
Figure 1. Though not as hard or as strong as regular setting compounds (at left), lightweight setting compounds (at right) are sandable and almost as easy to finish as premixed joint compounds.
While opening a bucket of mud is easier than mixing up a batch of setting compound, drying-type compounds (conventional premixed muds) can be tricky to work with. They perform best when the air, the compound, and the surface are all the same temperature — before, during, and after taping. They require a minimum temperature of 55°F; their drying time is greatly affected by temperature, humidity, and airflow. In fact, if conditions remain poor after taping is complete, it could take weeks for the mud to thoroughly dry.
Advantages of setting compounds. Setting compounds are more forgiving than their drying-type counterparts, so they offer better results under a wider variety of conditions. They can be used in temperatures as low as 45°F, and will set even in extreme humidity. They offer rapid hardening, low shrinkage, and an exceptional bond that is virtually unaffected by climate changes.
Keep in mind, though, that while setting compounds can be used even in low heat and high humidity conditions, quality drywall work still requires proper temperature, humidity, and airflow. Otherwise, cracking and ridging can occur as temperature and humidity levels normalize when the building is occupied.
Also, setting compounds shouldn’t be applied over moist, dusty, or cold surfaces. The same goes for very dry surfaces, because the moisture in the compound may be drawn out too fast, resulting in a poor bond.
Brands. Most lumberyards and paint-supply stores carry one or two varieties of setting compounds. I haven’t noticed any significant differences between brands, so I use what is available in my area — primarily Sheetrock Durabond and Easy Sand (www.usg.com).
Setting time. Setting compounds come with different setting times. Fiveminute compounds are great for quick patches, whereas 300-minute ones are perfect for overnight drying. I stock 20-minute, 45-minute, and 90-minute compounds, but use the 90-minute kind the most.
Sanding. Setting compounds also come in non-sandable and sandable versions. I use Durabond — a non-sandable compound — for heavier fills and in places where extra strength is needed, such as corner beads in heavy traffic areas and off angle inside corners on sloped ceilings.
Lightweight (sandable) setting compounds like Easy Sand aren’t as strong as the nonsandable types, but they can be sanded almost as easily as drying compounds.
Mixing
Despite their forgiving nature, setting compounds do need to be properly mixed. The temperature and quality of the water and the way in which the ingredients are mixed can affect the quality of the final product and its actual setting time.
Water temperature. Using cold water can result in a chunky mix, and can also slow the setting time. I’ve found that simply allowing the mixed compound to slake a few minutes longer than normal minimizes this problem.
Using hot water, on the other hand, decreases the setting time and can result in wasted material. A 45-minute compound, for instance, can set in as little as 35 minutes when it’s been mixed with hot water.
Compound temperature. One of the benefits of powdered mixtures is that they don’t have to be protected from freezing temperatures. Nevertheless, for best results the bags should be brought to room temperature before mixing; if the powdered compound is too cold you could end up with a lumpy mixture, and if it’s too warm the mix may cure too quickly.
Clean vs. dirty water. The quality and setting time of the mix — and the strength and bonding abilities of the final product — are always better when clean water is used. However, I’ve experimented with using the dirty water left over from cleaning mixing tools and empty buckets, and to my surprise, the resulting mix seemed very usable. Just the same, I don’t really recommend this approach if clean water is readily available, because it might make a five minute or 20-minute compound set too quickly to use; I’d also be concerned about the compound’s strength.
A more important issue when mixing is to avoid using dirty tools coated with setting compound, or buckets that still contain a thin layer of the stuff; these conditions have the biggest effect on setting time. Whether you’re using 90minute, 45-minute, or 20-minute compound, it’ll start to set up early if you use a coated tool or bucket. So always clean up as soon as you finish mixing a batch: Scrub your tools and the inside of the bucket and rinse with clean water. Merely setting your mixing paddle in a bucket of water won’t prevent the compound from setting up.

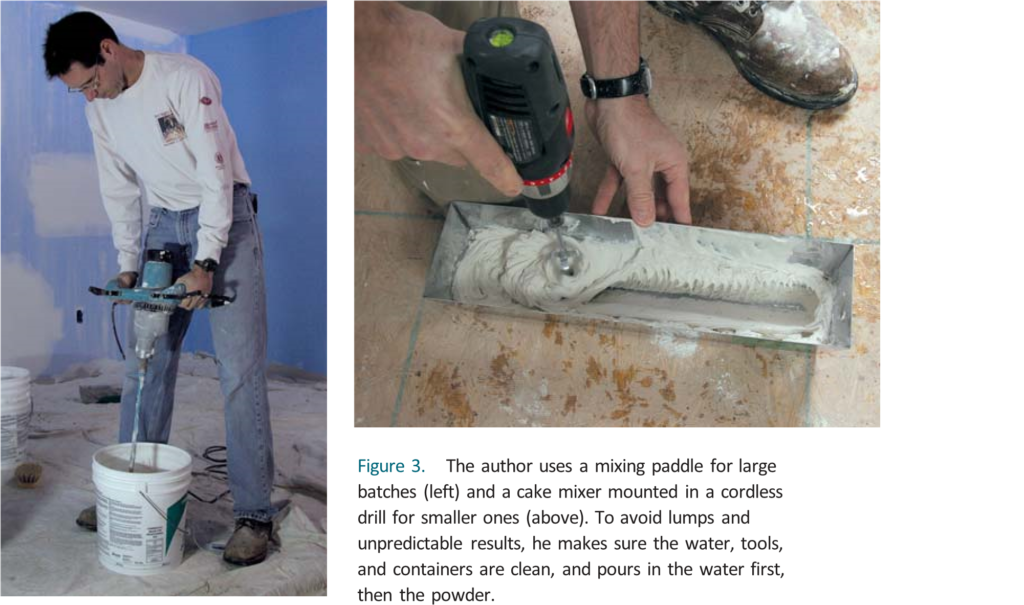
Add the compound to the water. Starting with clean water in a clean bucket or mud pan, I add a little compound at a time as I mix. Once it’s reached the desired consistency — that of premixed mud — I wait a few minutes to let the compound slake and to give chunks time to dissolve. Then I mix it again — just as I would do if I were mixing tile grout.
I use a mixing paddle for large batches, typically a single blade or cage type paddle, which makes cleanup easier. For small batches, I use a cake mixer installed in a drill; it gives me a quick and creamy mix.
For heavy fills, the compound can be mixed thicker so it won’t sag or run. Start thin, then add a little compound at a time to thicken the mix. Just make sure it’s thoroughly mixed, and be aware that thicker mixes tend to set up a little faster.
When embedding tape, I use a thinner mix (according to USG, setting compounds can be mixed quite thin without compromising strength). Setting compounds are usually used for hand taping, so there’s little need for the kind of extra-thin mix that would be used with production taping equipment.
Working With Compounds
The amount of compound I mix is based on the setting time and the size of the job. When taping a single room, for example, I may estimate that it will take 90 minutes to apply the taping coat. On a job like this, I typically want to be able to apply multiple coats of compound with as little time between layers as possible. But instead of using a 90-minute compound, I’ll mix up two or three small batches of the 45-minute material. That way, I can minimize waste and increase the likelihood that I’ll able to apply the next coat as soon as I finish.
If I have only the 90-minute compound with me and the job is small enough to coat in less time than that, I’ll mix the compound early. I may mix it up before I finish hanging the drywall, or before cleaning or doing other prep work.
It’s important to remember, though, that once the compound starts to set up, it cannot be remixed.
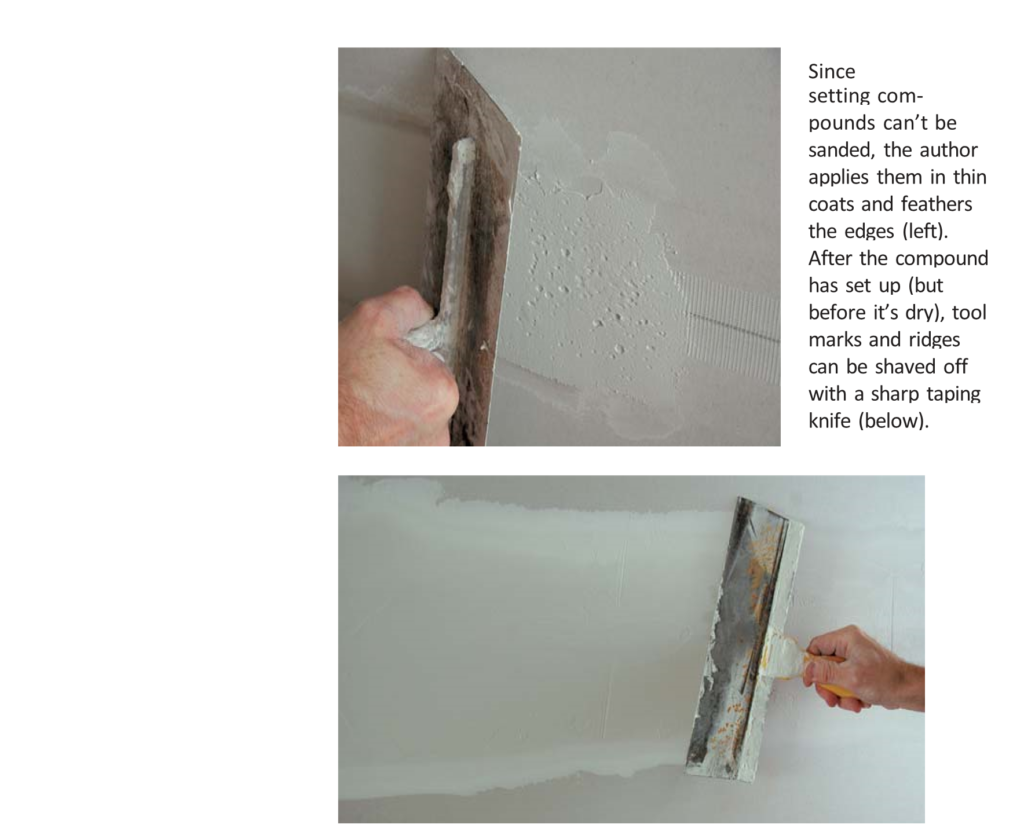
In general, I try to apply compound in thin, even coats with nicely feathered
edges. This is especially critical because regular setting compounds are virtually impossible to sand.
When I tape with a drying compound, I lightly sand before applying the finish coats, which removes tool marks and unfeathered edges and leaves a smooth finish. But sometimes I want to apply a second coat before the first coat is dry; in those cases — since a setting compound can’t be sanded while it’s wet — I use the sharp edge of a taping knife to shave off any uneven surfaces on the set up (but still wet) compound.
For the finish coat, I use a drying compound, which is a lit easier to work with when applying very thin top coats. No time is really lost, because in order to finish sand and then decorate all layer of compound have to be thoroughly dry.
Drying compounds can be applied over setting compounds and vise versa; just be aware that different compounds sand differently. If you’re finish coating with a lightweight drying compound over a setting compound you’ll need to be extra careful when sanding; the softer drying compound will sand away easier then the setting compound, leaving an uneven finish, especially if you’re using too soft of a sander. And before finishing and decorating all layers of compound must be dry
Myron Ferguson is a Drywall contractor in Saratoga Springs, NY